


A cannabis living soil mix is more than just dirt. It’s a complete ecosystem of bacteria, fungi, worms and minerals that feeds your plant naturally and just the way it needs. Once you understand how living soil works, you’ll barely need bottled nutrients, and you can still pull high-quality, aromatic buds. In this article, I’ll show you how to put together your own cannabis living soil recipe, which ingredients really matter and how to keep your soil life healthy for the long haul. Building it takes some time up front, but it pays off with less work, lower costs and an excellent final product.
What Exactly Is Cannabis Living Soil?
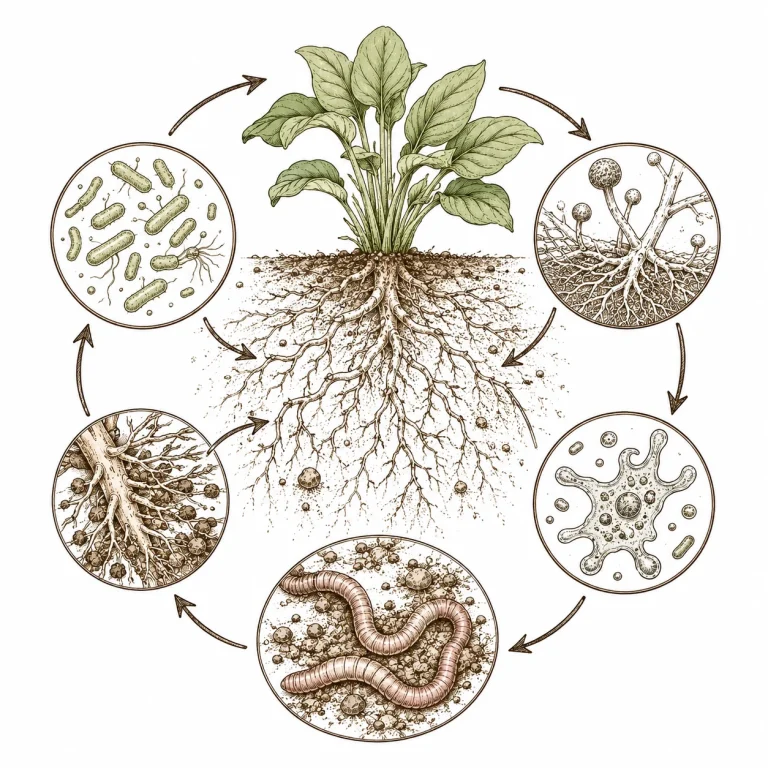
Cannabis living soil is soil that isn’t sterile. Instead, it’s deliberately loaded with a wide range of microorganisms, fungi and soil critters. Together, they form what’s called the soil food web. Bacteria break down organic matter and turn it into nutrients your plant can actually use. Mycorrhizal fungi (mycorrhizae) connect with the roots and multiply the area they can draw from. Predatory mites, springtails and earthworms keep the soil airy and well-structured. The Bavarian State Research Center (LWG Bayern) does extensive research on organic growing media and confirms the benefits of active soil life for plant nutrition.
Unlike conventional growing with synthetic liquid nutrients, the living soil approach doesn’t feed the plant directly. It feeds the soil life. The microbes convert organic nutrient sources like compost, guano or kelp into a whole range of compounds your plant can take up easily. This process is called biological activity or mineralization. The result: your plant pulls nutrients at its own pace, which largely rules out salt buildup and stress spikes.
Cannabis living soil has deep roots in the permaculture movement and was adapted for cannabis by pioneers like Clackamas Coots and TLO (True Living Organics). The concept is all about longevity: a well-built mix can last through several grow cycles if you keep it up with top dressings and compost teas. For home growers, this approach makes a lot of sense because it’s sustainable, budget-friendly and easy on your plants. Check the cannabis laws where you live before growing.
- Bacteria: Break down organic matter and supply nitrogen, phosphorus and other elements
- Mycorrhizal fungi: Team up with the roots and boost nutrient and water uptake
- Protozoa: Eat bacteria and release nitrogen in the process, right at the root zone
- Earthworms: Loosen up the soil, produce worm castings and improve drainage
- Springtails and predatory mites: Keep pests in check and break down organic debris
Cannabis Living Soil Recipe: The Key Ingredients for Your Cannabis Soil Mix
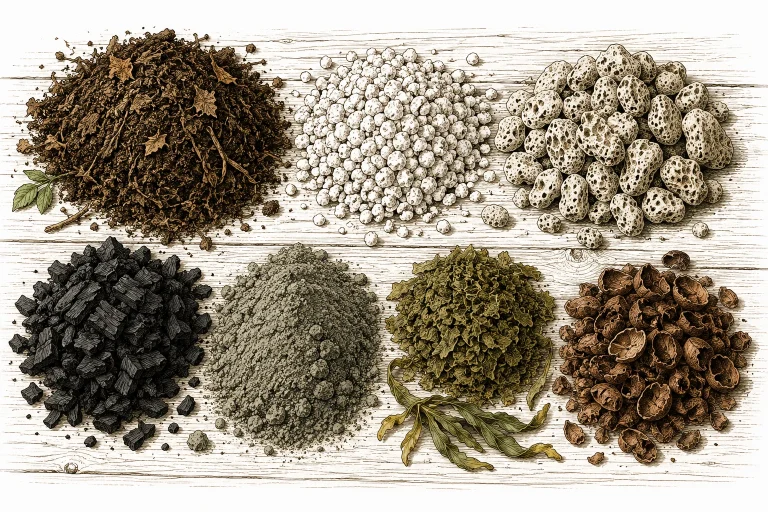
Every cannabis living soil recipe rests on three pillars: a good base soil, a structural component for drainage and aeration, and a diverse organic nutrient source. For your base, go with mature compost, quality garden soil or ready-made organic mixes without synthetic additives. What matters is that the base soil already contains humus and isn’t sterile.
For structure, growers use perlite, pumice or coarse quartz sand. These materials help prevent waterlogging, improve airflow in the root zone and protect sensitive soil life from anaerobic conditions. A share of 20 to 30% structural material in the total mix has proven itself. You can also add biochar, which holds water and nutrients and gives your microbes a home.
The nutrient sources are the most exciting part of the recipe. Proven ingredients include: worm castings (vermicompost) as a nutrient powerhouse, rock dust for trace elements and minerals, kelp meal as a source of micronutrients and growth hormones, hemp seed cake or soybean meal as a slow-release nitrogen source, and bone meal for phosphorus and calcium. All of these get mixed in dry and then activated during what’s called the cooking phase.
The cooking phase, also known as the conditioning phase, takes four to six weeks. During this time, you keep the finished mix moist (but not wet), turn it regularly and give the soil life time to colonize the raw materials and start breaking down the first nutrients. Only then do you plant into it. If you skip the cooking phase, you risk nutrient spikes that can stress your seedlings.
- Base (60-65%): Mature compost, organic garden soil or a ready-made organic potting soil
- Structure (20-30%): Perlite, pumice or coarse quartz sand for drainage and aeration
- Worm castings (10-15%): Vermicompost, the backbone of your soil biology
- Rock dust (1-2%): Supplies calcium, magnesium and over 60 trace minerals
- Kelp meal (0.5-1%): Micronutrients, natural plant hormones and vitamins
- Bone meal (1-2%): Slow-release phosphorus and calcium for the flowering stage
- Biochar (3-5%): Holds water, gives microbes a home and improves soil structure
- Cook for 4-6 weeks: Keep the mix moist and let it mature before you plant
Cannabis Living Soil in the Pot: Size and Setup
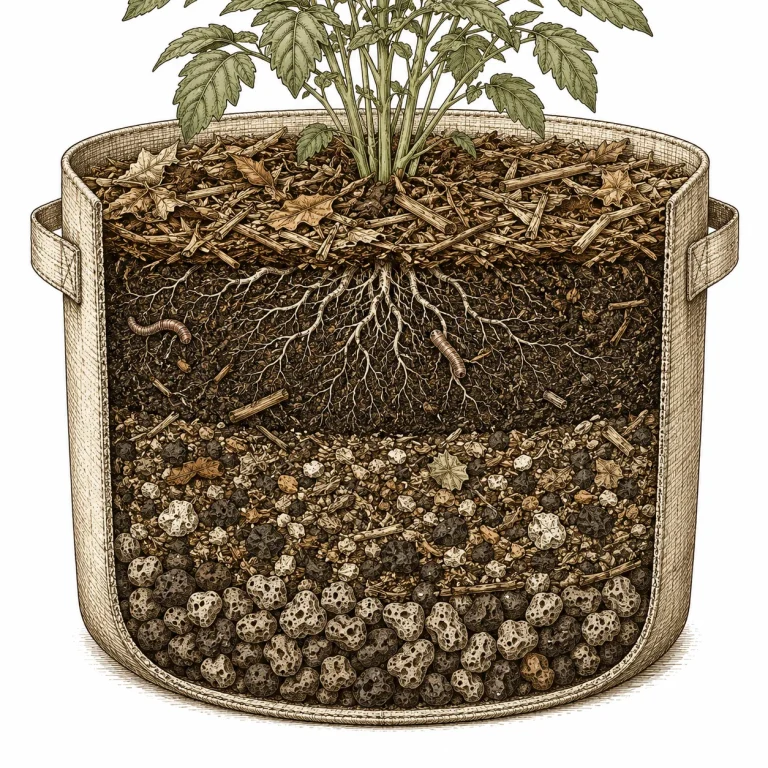
With cannabis living soil, the rule is simple: the bigger the pot, the more stable and alive the ecosystem. Plan on at least 8 to 13 gal (30 to 50 L) for indica-dominant strains. For sativas or plants that grow longer, 13 to 26 gal (50 to 100 L) or more is a good call. Small pots don’t have enough buffer capacity. The soil life wears out faster and the nutrient reserves get used up quickly. Many growers go with fabric pots because they breathe well and give your soil life a real boost.
When you fill the pot, add the soil slightly moist and don’t pack it down too hard. Loose soil encourages root growth and leaves plenty of air pockets. Top it off with a layer of mulch: straw, wood chips or cocoa bean hulls. This layer isn’t a luxury. It protects your soil life from drying out and from UV light, keeps temperatures steady and gives tiny critters a place to live right at the surface.
In cannabis living soil, the active soil life keeps the pH in check to a certain degree. Still, you should know your starting value and adjust it with lime (calcium carbonate) or sulfur if needed. Aim for a pH between 6.0 and 7.0. Your water should land in that range too. You’ll find more on this in our article on pH for cannabis.
- Minimum size 8 gal (30 L), ideally 13-26 gal (50-100 L) for a stable ecosystem
- Fabric pots improve airflow in the root zone and help prevent root rot
- A mulch layer of straw, wood chips or cocoa bean hulls covers the soil surface
- Target pH 6.0 to 7.0 – cannabis living soil partly regulates itself
- Fill the pot loosely, don’t compact the soil
Caring for Cannabis Living Soil: Watering, Feeding and Top-Dressing

Watering cannabis living soil follows the same basic rule as any other growing medium: do the finger test before you water, never keep it soggy and always let it dry out a bit first. That said, living soil gets watered a little more often and more evenly, because the soil life itself needs constant moisture. Overwatering is still a hard no. Waterlogged soil suffocates the beneficial aerobic microbes and invites mold and root rot. For a full walkthrough, check out our guide: How to water cannabis the right way.
Instead of liquid nutrients, the living soil approach relies on top-dressings and compost teas. Top-dressings are dry amendments you sprinkle on the soil surface. Every time you water, they slowly work their way into the soil, where the microbes break them down. Typical top-dressing ingredients are worm castings, kelp meal, bone meal for the flowering stage or neem cake as a natural pest deterrent.
Compost teas (ACT – aerated compost tea) are liquid brews made from compost, water and microbe food like molasses or oats. Aerating the brew for 24 to 48 hours multiplies billions of bacteria and fungi, and then you pour it straight into the soil. Compost teas wake up your soil life during stressful phases and after transplanting. They’re no substitute for a good soil mix, but they’re a powerful tool for recovery. A low-odor alternative from your kitchen is fermented bokashi juice from kitchen scraps.
Between grows, your living soil needs to recharge. Pull out the old roots as best you can, add fresh top-dressings and let the soil rest for a few weeks. With every cycle, the soil life matures and the soil gets richer. Many experienced growers say their soil performs best after the third or fourth run.
- Finger test before watering: topsoil dry, but not bone-dry
- Avoid overwatering – your soil life needs oxygen
- Top-dress 1-2x per grow: worm castings, kelp, bone meal or neem cake
- Add compost tea (ACT) after transplanting or during stressful phases
- Between grows: remove roots, re-amend, let the soil rest for 3-4 weeks
- Refresh the mulch regularly to keep the soil from drying out
Protect Your Soil Life: What to Avoid in a Cannabis Living Soil Setup
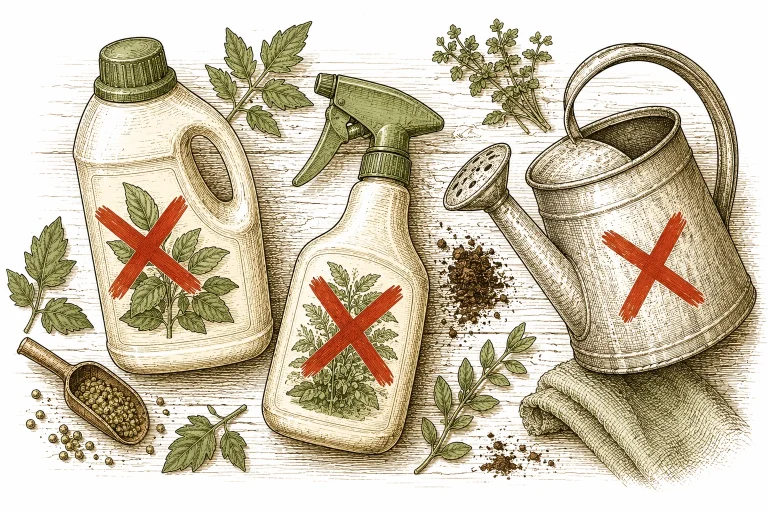
The biggest threat to living soil is often a well-meant reach for the chemical sledgehammer. Synthetic liquid nutrients with a high salt content can seriously harm the soil microbiome. High salt concentrations put osmotic stress on bacteria and fungi and can kill many of them. If you go with living soil, it’s best to skip synthetic nutrients entirely. Use them only as a stopgap in a real emergency, and then at a very low dose, applied as a watering only, never as a spray.
Many fungicides and pesticides are a problem for soil life, too. Copper products, sulfur sprays and systemic insecticides don’t just kill pests. They can also wipe out beneficial fungi and bacteria. For pest control in living soil, stick with organic methods: neem cake mixed into the soil, neem oil sprays (not during the flowering stage), predatory mites as natural enemies, or Bacillus thuringiensis (Bt) against larvae.
Chlorinated tap water can cause trouble as well, because chlorine may kill bacteria in the soil. Let the water sit open for 24 hours to off-gas, filter it, or use rainwater instead. Keep an eye on your cannabis pH when watering, too. Water that’s too acidic or too alkaline can throw the soil microbiome off balance over time. A pH of 6.2 to 6.8 in your water is ideal for living soil.
Nutrient burn is less common in living soil than with conventional feeding, but it can still happen when you first amend the soil. Mix in too many raw amendments and you risk burning your plants in the first few weeks. That’s why letting the soil cook matters so much: it gives the soil life time to bind and buffer excess nutrients. Want to know the warning signs? Check out our diagnosis article on cannabis nutrient burn.
- No synthetic nutrients with high salt content — they damage the microbiome
- No broad-spectrum fungicides or systemic insecticides in the soil
- Don’t use chlorinated tap water straight from the faucet — let it off-gas for 24 h or filter it
- Don’t add too much at once — cooking the soil first helps prevent overshooting
- No H2O2 in the soil — it kills beneficial bacteria too
- No sealed pots without drainage
Chlorine and Chloramine in Your Water
Chlorine in tap water off-gasses if you let the water sit open for about 24 hours. But some water utilities disinfect with chloramine, and that’s much more stable: letting it sit barely gets rid of it. Your local water utility can tell you whether your water contains chlorine or chloramine.
A carbon filter takes care of chloramine, or you can switch to rainwater. One sign of problem water: your soil life seems to stall and nutrient uptake drops off, even though your soil mix and feeding should be on point. In living soil, checking your water is especially worth it, because the microorganisms are the ones unlocking nutrients for your plant.
Spotting Nutrient Problems in Cannabis Living Soil

Nutrient problems can show up in living soil too. They often look similar to what you see in conventionally grown plants, but the causes are usually different. A nitrogen deficiency in mature living soil rarely means nutrients are missing. More often, biological activity has slowed down, for example because of overwatering, cold or the wrong pH. Yellowing lower leaves can be a sign that nitrogen mineralization is slowing.
Iron and zinc deficiencies in living soil often show up when the pH has crept too high (above 7.0). At that point, micronutrients become insoluble and your plant can’t take them up, even though they’re sitting right there in the soil. A compost tea with a slightly acidic pH and a splash of apple cider vinegar can help restore the balance. A calcium deficiency can also appear if the soil wasn’t amended with enough calcium-rich materials like lime or bone meal. Learn more in our article on calcium deficiency in cannabis.
The best indicator of healthy living soil is the root system. White, sturdy roots with visible white fungal threads (mycelium) are a sign of an active microbiome. Brown, slimy or rotting roots signal trouble. Another good check: your soil should smell like fresh forest floor or earth — not rotten, not fermented. When you grow on a healthy foundation, you’ll usually run into major nutrient problems less often than with conventional methods.
- Yellow lower leaves: nitrogen release from organic matter has stalled. Check your soil’s biological activity.
- Pale leaf areas with green veins (chlorosis): pH is too high and micronutrients are locked out.
- Brown root tips or mold: overwatering or anaerobic conditions.
- Growth stalls: cold slows down soil life. Keep your soil at 64–75 °F (18–24 °C).
- Healthy living soil smells like a forest floor, not like rot.
- White fungal threads (mycelium) in the soil are a good sign. No need to panic.
Want to see how living soil stacks up against other growing media? Check out our growing medium comparison. If you’d like to build your own mix, you’ll find step-by-step instructions in mixing your own soil.
Frequently Asked Questions
Can I buy living soil for cannabis, or do I have to mix it myself?
Grow shops now carry ready-made living soil. It comes preloaded with organic nutrients, and some brands already contain active microbes. If you’re new to this, a premixed product is a great choice. If you want more control or want to save money, mix your own. The basic recipe is cheap and easy to scale up. Keep in mind: even premixed soil usually needs a short cooking or activation period before it performs at its best.
How long does living soil last, and how often do I need to replace it?
Well-maintained living soil can last through many grow cycles. Some experienced growers have been reusing the same soil for years. Between runs, you pull out the old roots, work in fresh top-dressings and let the soil rest for a few weeks. With every cycle, the soil life matures and becomes more stable. Only consider starting over if the soil gets compacted, smells bad or shows no more biological activity.
Do I need mycorrhizal products if I use living soil?
If your soil has plenty of mature compost and worm castings, it already contains natural mycorrhizal spores. Extra mycorrhizal inoculants can still help, especially in a fresh mix or after transplanting. Apply them directly to the roots or sprinkle them into the planting hole. One important note: high-phosphorus nutrients can suppress the mycorrhizal partnership. If you’re going the living soil route, skip highly concentrated phosphorus sources.
Can I use living soil for outdoor growing too?
Absolutely. Living soil can work especially well outdoors, because the natural environment already brings a rich soil life with it. You can build your soil with the same ingredients in a raised bed or right in the ground. Rainwater is ideal because it contains no chlorine. Outdoors you can often skip the cooking phase, since warmth and humidity speed up activation. Still, giving the soil a little extra time before planting is a smart move.
Do I still need to check pH in living soil?
Yes, pH still matters in living soil. Soil life buffers extreme swings, but it doesn’t replace regular checks. Your water in particular should sit between pH 6.2 and 6.8. If you see deficiency symptoms, a pH that’s too high or too low is often the cause. Our article on pH for cannabis covers everything you need to know about measuring and adjusting it.
Can pests multiply in living soil?
An active soil food web with springtails, predatory mites and bacteria keeps a lot of pests in check. Springtails, for example, do a great job of keeping fungus gnats under control. You can still get an infestation, though, especially if you keep the growing medium too wet or the mulch layer is too thick. Organic countermeasures like neem cake mixed into the soil or neem oil sprays work fine with the living soil approach. Broad-spectrum chemical pesticides don’t.
Living soil is one branch of the bigger topic of organic cannabis growing. Head over there to learn the basics of a sustainable, natural grow.
We’ve rounded up the right living soil ingredients on our Recommended Gear page.
Bottom Line
Cannabis living soil is a great fit if you prefer a sustainable, natural grow and want less hassle with feeding and maintenance in the long run. With the right recipe, a long enough cooking phase and consistent organic care, you build a stable, nutrient-rich ecosystem over time that gives your plants everything they need. The key thing to understand: you’re not feeding the plant, you’re feeding the soil life. Make that mindset shift, be patient, and you can be rewarded with healthy plants, fewer problems and top-quality buds. To support your living soil plants every step of the way, check out everything about plant health in our Plant Diagnosis section.
